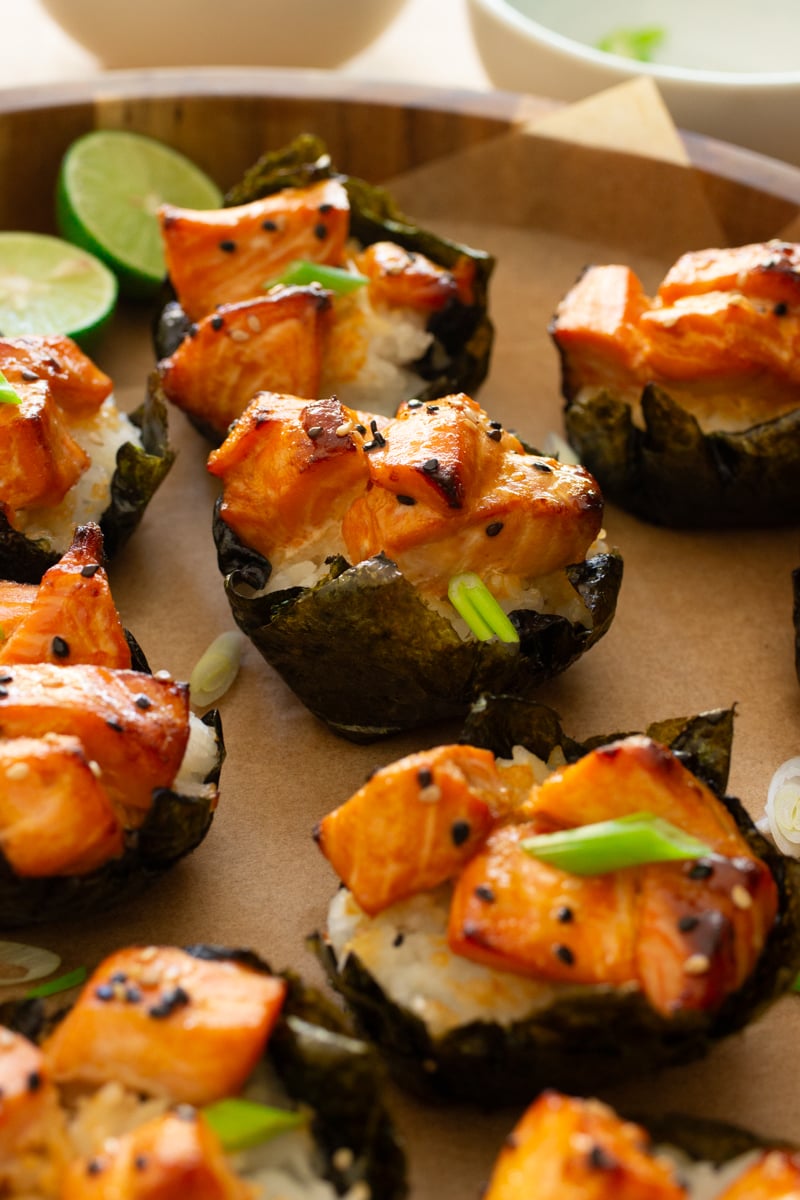
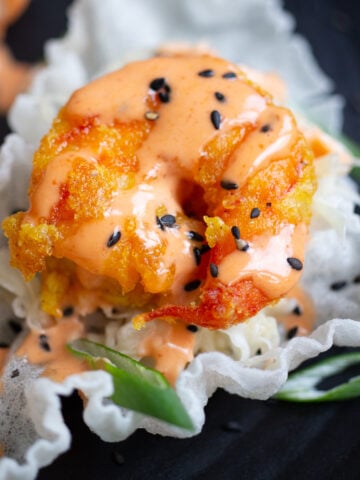
This easy viral Baked Salmon Sushi Cups recipe will blow your mind. It is a definite crowd-pleaser! Perfectly portioned individual-sized sushi bake with salmon combine the rich flavors of salmon, creamy Kewpie mayo, and a touch of heat from the sriracha.
This trendy recipe has taken TikTok by storm, and for all the right reasons!
Would you like to save this recipe?
This is great as an appetizer for sushi lovers or when you are craving sushi but do not want to spend a gazillion dollars.
Jump to:
- Why you will love this sushi bake with salmon recipe
- What you need for Salmon Sushi Bake
- How to make easy salmon sushi cups
- How to make sushi rice
- Substitutions
- Variations
- Equipment
- How to store and reheat baked sushi cups
- How to air fry Salmon Sushi Bake
- 3 Top Tips for Success
- About Carmen
- Salmon Sushi Bake Cups - FAQ
- Related
- Here are other seafood recipes you should try
- Viral Easy Baked Salmon Sushi Bake Cups
- Food safety
Why you will love this sushi bake with salmon recipe
- Convenient Individual Portions: The best part of this Viral TikTok Salmon Sushi Cups recipe is its individual-sized portions. Each cup is a perfectly balanced, ready-to-eat serving, making it ideal for sharing with a friend or well, eating both cups. No one will judge you.
- When you're craving sushi but don't want to spend: This is a great alternative for when you need a quick lunch or when you crave sushi but don't want to go out and spend a gazillion dollars. They're basically deconstructed sushi rolls.
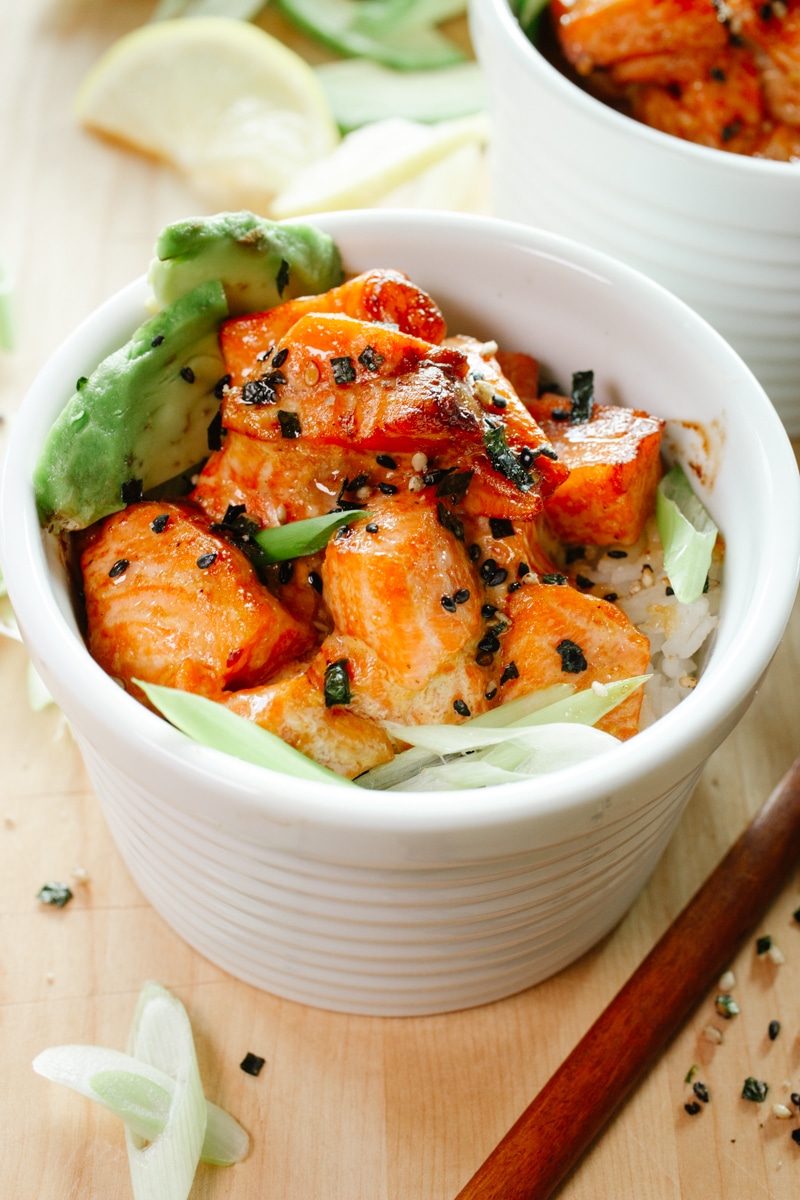
- Great for Potlucks: This is perfect for get-togethers, any potlucks! It is single serve and people can dress their own cups with toppings like furikake, kewpie mayo, sriracha, avocado or cucumber slices.
What you need for Salmon Sushi Bake

- Sushi rice
- Rice vinegar
- Mirin
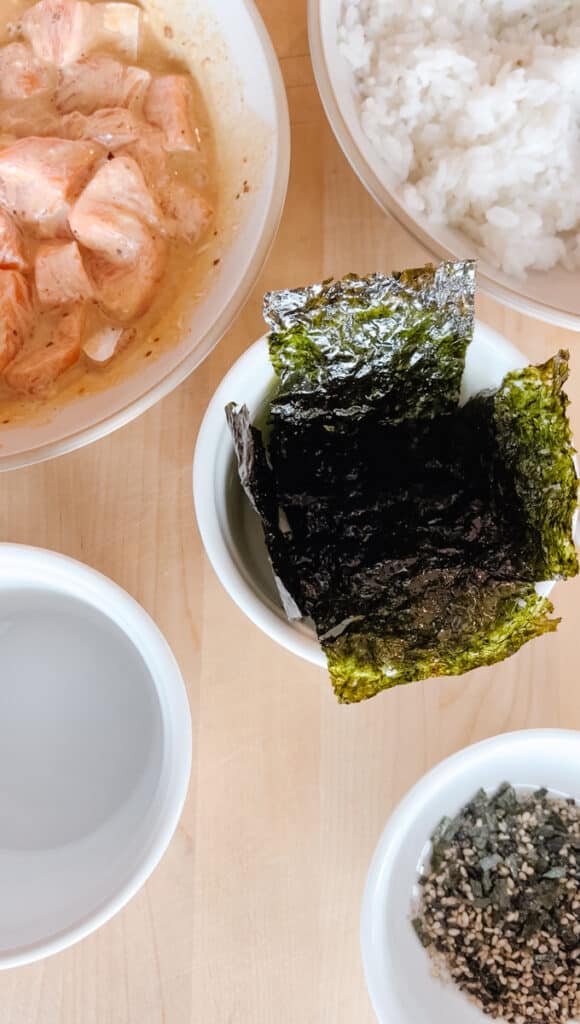
- Nori sheets
- Fresh salmon
- Soy sauce
- Kewpie mayo
- Sriracha
Garnish
- Avocado
- Furikake
- Green onion
- Kewpie mayo
- Sriracha
- Sesame seeds
See recipe card for quantities.
How to make easy salmon sushi cups
Making sushi cups is easy. Here is the step-by-step guide for the easiest and best sushi bake with salmon recipe.
Prepare the sushi rice. I used leftover rice for this. However, make fresh sushi rice if you want.
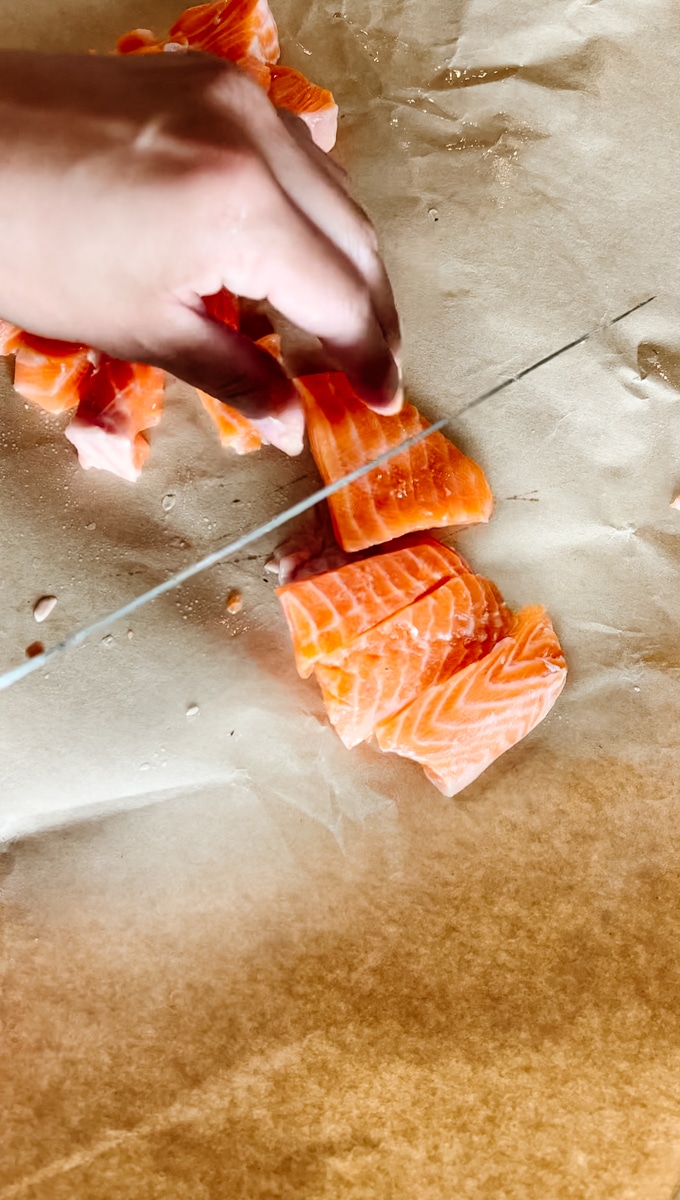
Cube the salmon.

Salmon marinade. Soya, kewpie mayo and sriracha.
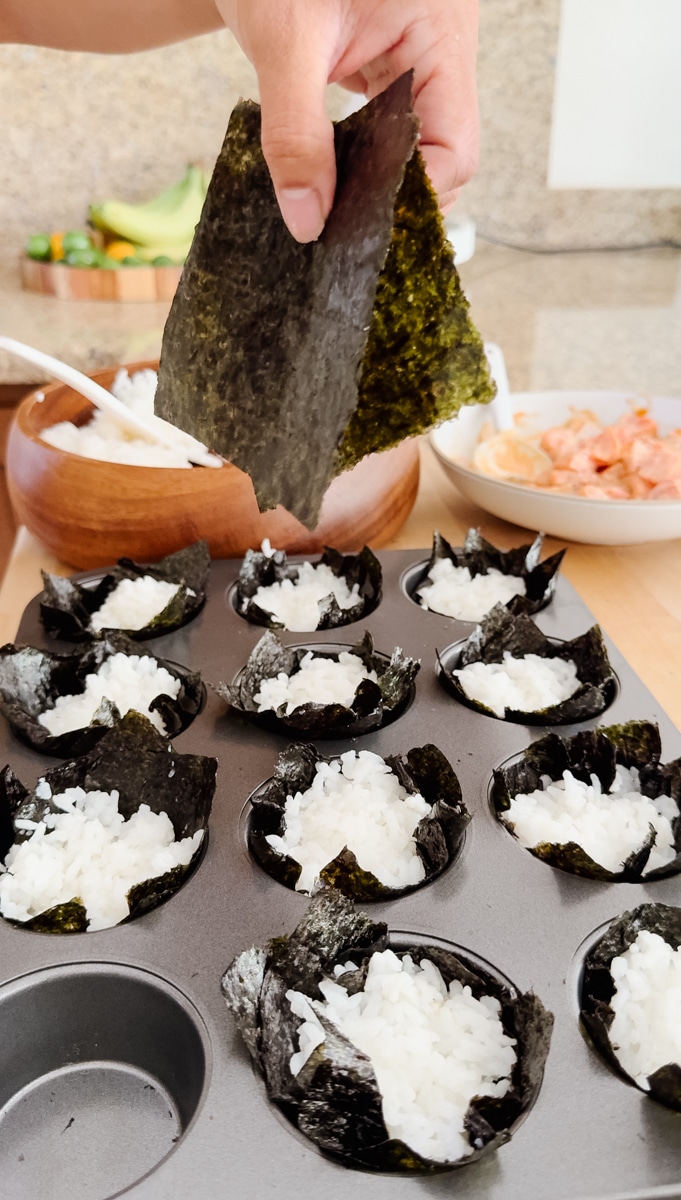
Arrange the sushi cups starting with the nori, then rice then the salmon.
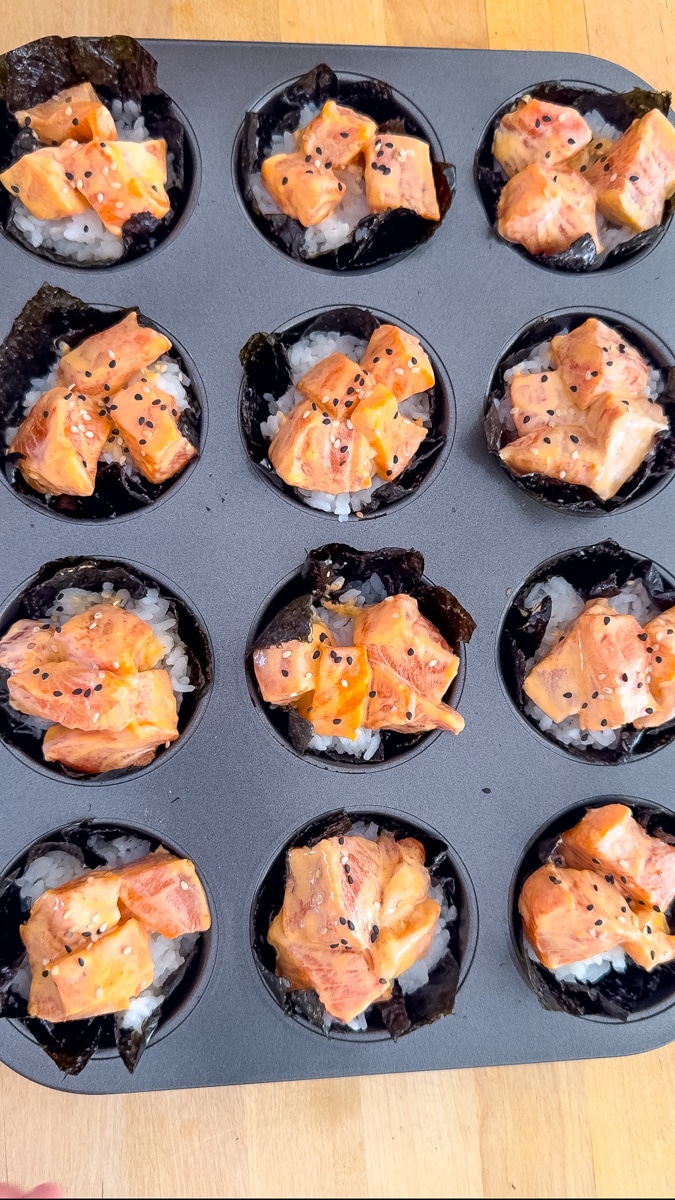
Ready for baking.

Bake for 12 minutes.
1. Preparing the Salmon:
- Preheat the oven to 400°F
- Begin by cutting the skinless salmon into bite-sized cubes.
2. Marinating the Salmon:
In a large bowl, place salmon cubes, soy sauce, Kewpie mayo, and sriracha. Gently mix to coat the salmon evenly with the flavors. Set aside to marinate while you prepare the other components.
3. Flavoring the Sushi Rice:
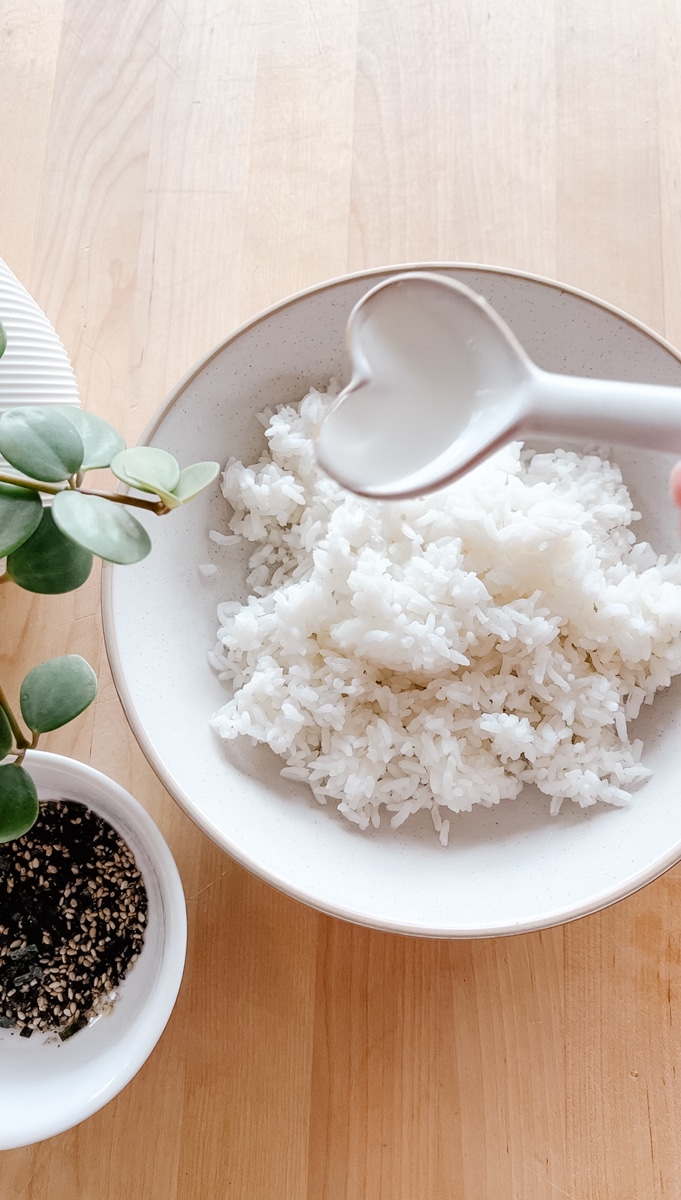
- In a separate bowl, combine the warmed* and cooked sushi rice, rice vinegar, and mirin. Gently fold the ingredients together.
- * if using day-old rice, warm it up in the microwave for 50 seconds. It will soften up the rice.
4. Assembling the Salmon Sushi Bake Cup:
- Line the muffin tins with two pieces of roasted nori sheets diagonally, creating a small "basket" to hold the ingredients.
- Spoon approximately 2 tablespoons of the prepared sushi rice into each nori-lined cup, gently pressing it down to create a base.
- Top the cooked rice with the marinated salmon mixture, distributing it evenly among the cups.
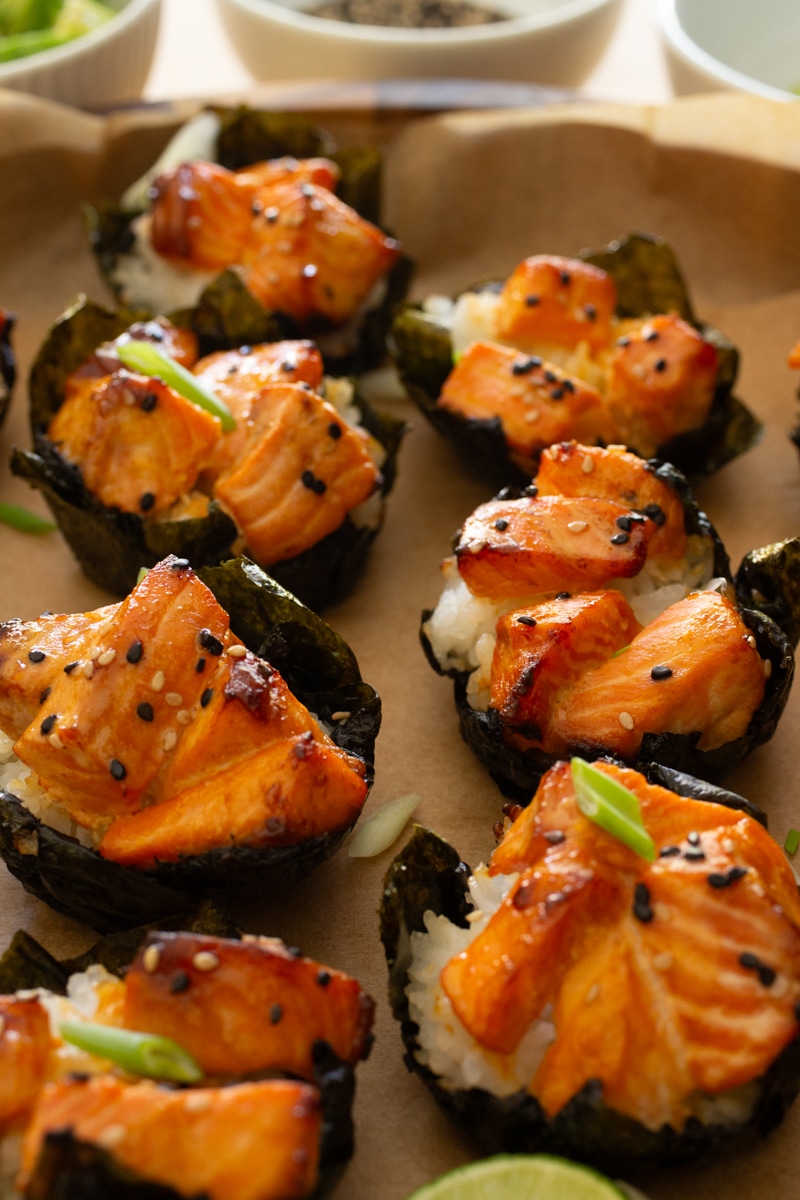
5. Baking and Garnishing:
- Bake the salmon sushi cups at 400°F (200°C) for about 12 minutes, allowing the flavors to meld and the salmon to cook to perfection. Broil for 1-2 minutes for a crisp top.
- Remove the cups from the oven and let them cool slightly.
6. Serve and Enjoy:
Garnish each cup with slices of sesame seeds, avocado, chopped green onions, kewpie mayo, sriracha, and more furikake.
How to make sushi rice
If you're new to making sushi rice, follow these simple steps:
Rinse 1 cup of sushi rice thoroughly under cold water until the water runs clear.
Cook the rice according to package instructions. If you have a rice cooker, that works perfectly. Otherwise, you can cook it on the stovetop.
Once the rice is cooked, mix it with a dash of rice vinegar and mirin, as mentioned in the recipe. This step gives the rice its signature sushi rice flavor and texture.
Substitutions
Cooked Sushi Rice: Use quinoa, cauliflower rice, jasmine rice, or any cooked short-grain rice like Arborio rice.
Rice Vinegar: Replace with apple cider vinegar or white wine vinegar.
Mirin: Mix equal parts of white wine or sherry and a pinch of sugar as a replacement for mirin.
Roasted Nori Seaweed: Substitute with fresh lettuce leaves or thinly sliced cucumber for a refreshing crunch.
Salmon: Opt for any firm white raw fish like cod, halibut, or tilapia. For a vegetarian option, use marinated tofu or tempeh.
Soy Sauce: Use tamari sauce (gluten-free alternative) or coconut aminos for a soy-free option.
Kewpie Mayo: Make a homemade mayo using olive oil or use any regular mayo.
Sriracha: Replace with your preferred hot sauce or chili sauce for heat. Chili oil will work too.
Garnish:
Sliced Avocado:
Substitution: Top with slices of mango or cucumber for a fresh and creamy element.
Green Onions:
Substitution: Use chives, parsley, or cilantro for a burst of herbaceous flavor.
Spicy Mayo (Kewpie Mayo and Sriracha):
Substitution: Create a tangy and spicy sauce using plain yogurt and hot sauce or mix tahini with a dash of chili powder.
Variations
Here are different variations you can try with this easy sushi bake recipe.
- Not into Salmon? - use tuna or prawns
- Vegan - use firm tofu
- Kid-friendly - omit the sriracha and use cooked chicken. Have the kids pick what they want to put into the sushi-baked cups.
Equipment
- Muffin tray
- Small bowl
- Measuring spoons and cups
- Knife
- Cutting board

How to store and reheat baked sushi cups
Here's how to store and reheat leftover sushi salmon bowls properly:
Storing:
- Refrigeration: Place them in an airtight container or cover them tightly with plastic wrap to prevent moisture from getting in and affecting the texture.
- Storage Time: Consume the leftover sushi cups within 1-2 days for the best taste and texture.
Reheating:
- Oven Method: To reheat the sushi cups, preheat the oven to around 350°F (175°C) reheat for 10 minutes. Cover the cups on a baking sheet with aluminum foil to prevent over-browning.
- Air Fryer Method: You can reheat the sushi salmon cups if you have an air fryer. Air fry for 5 minutes at 350°F (175°C).
How to air fry Salmon Sushi Bake
You can also make individual salmon sushi cups using a ramekin. Do the same process and air fry for 12 minutes. This quick and easy hack is perfect for a single serve if you do not want to make 12 individual servings.

3 Top Tips for Success
Here are three top recipe notes to ensure your success.
1. Perfectly Prepped Ingredients:
Consistent Cubes: For perfectly cooked salmon, cut them into similar sizes. This ensures even cooking and a consistent texture throughout.
Flavorful Rice: Mixing the cooked sushi rice with rice vinegar and mirin is crucial for that signature sushi sticky rice flavor.
2. Assembly and Presentation:
Nori Basket: Make sure the nori squares form a "basket" that will hold the rice and your favorite toppings securely.
Garnish: Place the sliced avocado and any other garnishes thoughtfully on top of the salmon mixture.
3. Do not overcook the salmon:
Precise Baking Time: Avoid overcooking salmon. Aim to bake at 400°F (200°C) for about 10 minutes and then broil for a quick minute to achieve a beautifully bubbly top.
Broiling Caution: The goal is to achieve a golden top without burning the nori or the toppings.

About Carmen
Hello, I am so happy you are here. I am the recipe developer, writer, photographer, videographer, and editor behind Eat with Carmen. My blog is all about celebrating love, family, and culture. My website is dedicated to all things Filipino recipes and other Asian recipes, entertaining, travel, family, and so much more. Here you will find easy, approachable recipes that you and your family and friends will love.
Salmon Sushi Bake Cups - FAQ
Sushi bake typically consists of cooked sushi rice mixed with seasoned seafood, like crab or salmon, combined with a blend of creamy sauces, Japanese mayonnaise, and various toppings. It's baked until warm and slightly crispy, resulting in a deconstructed and flavorful sushi-inspired dish.
Absolutely! It's a perfect way to enjoy sushi with minimal hassle. All you need to do is thaw the salmon according to the package instructions, and it's ready for use in your recipe.
Yes, but I recommend using short-grain sushi rice for the best results. It has a sticky texture that holds together well and absorbs all the delicious flavors of the salmon, mayo, and chili oil.
Related
Looking for other recipes like this? Try these:


Here are other seafood recipes you should try
These are my favorite seafood dishes you need to try.


Viral Easy Baked Salmon Sushi Bake Cups
Ingredients
Equipment
Method
- Preheat the oven to 400°F
- Begin by cutting the skinless salmon into bite-sized cubes.
- In a large bowl, place salmon cubes, soy sauce, Kewpie mayo, and sriracha. Gently mix to coat the salmon evenly with the flavors. Set aside to marinate while you prepare the other components.
- In a separate bowl, combine the warmed* and cooked sushi rice, rice vinegar, and mirin. Gently fold the ingredients together.
- * if using day-old rice, warm it up in the microwave for 50 seconds. It will soften up the rice.
- Line the muffin tins with two pieces of roasted nori sheets diagonally, creating a small "basket" to hold the ingredients.
- Spoon approximately 2 tablespoons of the prepared sushi rice into each nori-lined cup, gently pressing it down to create a base.
- Top the cooked rice with the marinated salmon mixture, distributing it evenly among the cups.
- Bake the salmon sushi cups at 400°F (200°C) for about 12 minutes, allowing the flavors to meld and the salmon to cook to perfection. Broil for 1-2 minutes for a crisp top.
- Remove the cups from the oven and let them cool slightly.
- Garnish each cup with slices of sesame seeds, avocado, chopped green onions, kewpie mayo, sriracha, and more furikake.
Notes
- Rinse 1 cup of sushi rice thoroughly under cold water until the water runs clear.
- Cook the rice according to package instructions. If you have a rice cooker, that works perfectly. Otherwise, you can cook it on the stovetop.
- Once the rice is cooked, mix it with a dash of rice vinegar and mirin, as mentioned in the recipe. This step gives the rice its signature sushi rice flavor and texture.
- You can also make individual salmon sushi cups using an oven-safe ramekin.
- Do the same process and air fry for 12 minutes. This quick and easy hack is perfect for a single serving if you do not want to make 12 individual servings.
Tried this recipe?
Mention @eatwithcarmen in all social platformsFood safety
- Cook to a minimum temperature of 165 °F (74 °C)
- Do not use the same utensils on cooked food, that previously touched raw meat
- Wash hands after touching raw meat
- Don't leave food sitting out at room temperature for extended periods
- Never leave cooking food unattended
- Use oils with high smoking point to avoid harmful compounds
- Always have good ventilation when using a gas stove
See more guidelines at USDA.gov.


Frances says
Its viral so i cant help but to make it haha
Ryder says
Felt guilty eating all by my self😥 haha
Paul T says
Flavor was incredible and I love a good salmon recipe. Highly recommend making this.
Nadine Kool says
Absolutely delicious! Was very easy to make and everyone loved it!!
Lourdes A says
❤️❤️ 🔥 🔥
Carmen Spillette says
💜